Tuesday, October 9, 2018

Set Environment Variables in windows

Why do I need to set JAVA_HOME?

Many Java based programs like Tomcat require JAVA_HOME to be set as environment variable to work correctly. Please note JAVA_HOME should point to a JDK directory not a JRE one. The point of setting the environment variable is to let programs know in which directory executables like javac can be found.

1. Open Advanced System Settings

In Windows 10 press Windows key + Pause Key, This will open the System Settings window. Go to Change settings and select the Advanced tab.

2. Set JAVA_HOME Environment variable

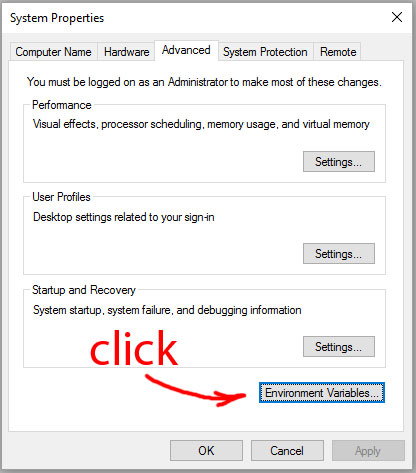
In “System Properties window” click “Environment Variables…”
system properties window environment variables
Under “System variables” click the “New…” button and enter JAVA_HOME as “Variable name” and the path to your Java JDK directory under “Variable value”
Add JAVA_HOME as system variable

3. Update System PATH

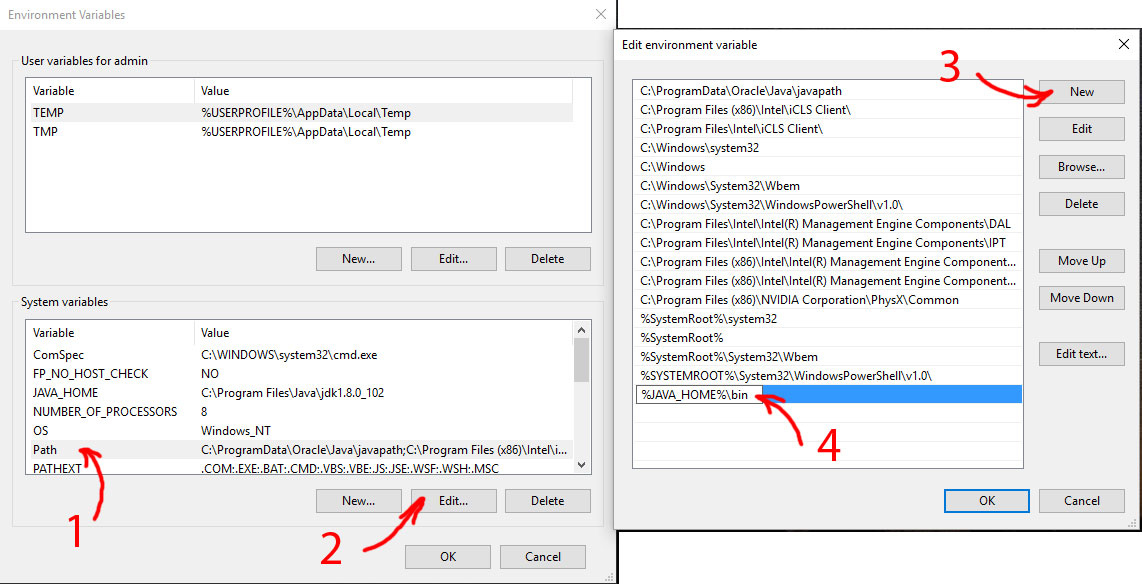
1. In “Environment Variables” window under “System variables” select Path
2. Click on “Edit…”
3. In “Edit environment variable” window click “New”
4. Type in  %JAVA_HOME%\bin
Update system path
Update system path

4. Test your configuration

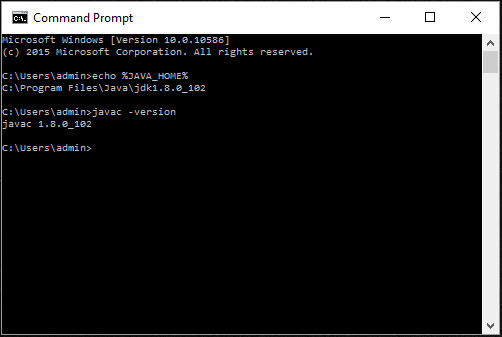
Open a new command prompt and type in:
  1. echo %JAVA_HOME%
this will print out the directory JAVA_HOME points to or empty line if the environment variable is not set correctly
Now type in:
  1. javac -version
this will print out the version of the java compiler if the Path variable is set correctly or “javac is not recognized as an internal or external command…” otherwise
Test JAVA_HOME and system path

Thursday, February 2, 2017

What is JPA? How does it differ from Hibernate or any other ORM implementation?

The Java Persistence Architecture API (JPA) is a Java specification for accessing, persisting, and managing data between Java objects / classes and a relational database.  Let's take a further look at this definition.  As the API portion of the name implies, JPA is a specification, meaning it provides guidelines for developing an interface that complies with a certain standard.  
While JPA dictates an interface, it does not provide an implementation of that interface, meaning there is no underlying code that performs the operations to persist an object to a relational database.
It should also be noted the term Object Relational Mapping, is often used to describe the process of accessing, persisting and managing data between Java objects and a relational database.

To look at the concept of JPA from another perspective, imagine if you were provided this interface.
   
public interface JPA {
    
    public void insert(Object o);
    
    public void update(Object o);
    
    public void delete(Object o);
    
    public Object select();
    
}

Without further development, what immediate value does this interface provide?  While this interface has potential to provide value, at this point, very little value is provided because the interface lacks an implementation.  If this interface is used within any code it will not execute because no concrete objects that implement this interface exist to perform the work.  This same concept applies to JPA just on a larger scale since the API specification defines many interfaces and annotations.
This is where the role of the JPA provider comes into play.  JPA providers develop a JPA implementation that meets the requirements of the JPA specification.  Hibernate is a JPA Provider, as well as others such as EclipseLink and TopLink.  With a JPA implementation in place Java objects can be now be persisted to a relational database, since there is underlying code to perform the work.
Returning to our interface analogy, if JPA is the interface then Hibernate represents a class that implements the interface.

public class Hibernate implements JPA {

    public void insert(Object o) {
       // Persistence code
    }

    public void update(Object o) {
       // Persistence code
        
    }

    public void delete(Object o) {
      // Persistence code
        
    }

    public Object select() {
        // Persistence code
    }
    
    public Object SelectAll(){
        // Persistence Code
    }
}

Notice that in addition to implementing the JPA interface, the Hibernate class contains some methods superfluous to the interface.  Keep this in mind for later.  Given this JPA implementation, we could now write some code that relies upon it to persist some data to a relational database.
   
public class MyApplication {

    public static JPA jpa = new Hibernate();
    
    public static void main(String[] args) {
        Object object = new Object();
        jpa.insert(object);  //writes to DB
    }
}

The new application works well initially, but after a couple of months its performance degrades.  Let's assume that the Hibernate implementation behind the scenes has several deficiencies causing  the poor performance.  Remember, this is for example purposes and I am not judging the merit of Hibernate.
Upon encountering this issue, another provider may decide the need for another JPA implementation exists.  This provider creates their own implementation of the JPA specification and publishes the code.

public class OpenJPA implements JPA {
    // Implementation
}

Having used the JPA interface in our application, we can now easily make the switch to the more reliant JPA implementation.

public class MyApplication {

    public static JPA jpa = new OpenJPA();
    
    public static void main(String[] args) {
        Object object = new Object();
        jpa.insert(object);  //writes to DB
    }
}

The concept illustrated in our simple example is the main value JPA provides only on a much larger scale.  If we choose to use JPA, we can eventually switch out our chosen JPA implementation for another implementation as long as they both meet the JPA specification.  In reality, this is not always a seamless transition, since we often utilize features of the implementation that are not support by the specification and each implementation has its own little quirks.  To illustrate this point, consider if we had called the SelectAll method within our application.
public class MyApplication {

    public static Hibernate jpa = new Hibernate();
    
    public static void main(String[] args) {
        Object object = new Object();
        jpa.insert(object);  //writes to DB
        jpa.SelectAll();
    }
}

Notice that in order to call the method, the interface of type JPA must be replaced with the Hibernate implementation.  At this point, we cannot swap our JPA implementation to the OpenJPA JPA implementation because its interface does not contain the SelectAll method.  This example attempts to illustrate the restrictions that occur when a developer chooses to use the straight Hibernate implementation, which is not bound by the JPA specification.
In summary, JPA is not an implementation, it will not provide any functionality within your application.  Its purpose is to provide a set of guidelines that can be followed by JPA providers to create an ORM implementation in a standardized manner.  This allows the underlying JPA implementation to be swapped and for developers to easily transition (think knowledge wise) from one implementation to another.  Hibernate is arguably the most popular JPA provider.  Hibernate's JPA implementation is used by many developers, however some choose to use the actual Hibernate implementation itself because the implementation may contain advanced functionality not contained in the JPA implementation.

Friday, October 7, 2016

Unique Random 'N' digit Number generator

package com.santhosh.test;

import java.util.Random;

import org.apache.commons.lang3.StringUtils;

public class SequenceGenerator {
    private final Random random;

    public SequenceGenerator() {
        random = new Random();
    }

    /**
     * Returns a pseudo-random integer between 0 and n-1.
     *
     * @see Random#nextInt(int)
     */
    public int nextInt(int n) {
        return random.nextInt(n);
    }

    public static void main(String[] args) {
        SequenceGenerator g = new SequenceGenerator();
        String result = StringUtils.leftPad(String.valueOf(g.nextInt(99999)),
                5, '0');
        System.out.println(result);
    }
}

Wednesday, March 30, 2016

Java Interview Preparations - Basics

Generics 

Generics in java is introduced as a feature in JDK 5. In general, generics force type safety in java. Generics make your code easy during compile time for type checking. Below two are the two main advantages i see in using generics.
a)  Type Safety:
 It’s just a guarantee by compiler that if correct Types are used in correct places then there should not be any ClassCastException in runtime. A usecase can be list of Integer i.e. List<Integer>. If you declare a list in java like List<Integer>, then java guarantees that it will detect and report you any attempt to insert any non-integer type into above list
b) Type Erasure: It essentially means that all the extra information added using generics into sourcecode will be removed from bytecode generated from it. Inside bytecode, it will be old java syntax which you will get if you don’t use generics at all. This necessarily helps in generating and executing code written prior java 5 when generics were not added in language.
 
Let’s understand with an example.


List<Integer> list = new ArrayList<Integer>();
list.add(1000);     // works fine
list.add("santhosh"); // compile time error

When you write above code and compile it, you will get error as : “The method add(Integer) in the type List<Integer> is not applicable for the arguments (String)“. Compiler will warne you. This exactly is generics sole purpose i.e. Type Safety.
Second part is getting byte code after removing second line from above example. If you compare the bytecode of above example with/without generics, then there will not be any difference. Clearly compiler removed all generics information. So, above code is very much similar to below code without generics.


List list = new ArrayList();
list.add(1000); 


Generic Types:

Generic Type Class or Interface
 For example, we can right a simple java class as below with out generics representation.

class SimpleClass {
   private Objectt;
   public void set(Object t) { this.t = t; }
   public Object get() { return t; }
}

Here we want that once initialized the class with a certain type, class should be used with that particular type only. e.g. If we want one instance of class to hold value t of type ‘String‘, then programmer should set and get the only String type. Since we have declared property type to Object, there is no way to enforce this restriction. A programmer can set any object; and can expect any return value type from get method since all java types are subtypes of Object class.

class SimpleGenericClass<T> {
   private T t;
   public void set(T t) { this.t = t; }
   public T get() { return t; }
}

Generic Type Method or Constructor


hashCode and equals methods in java

hashCode() and equals() methods have been defined in Object class which is parent class for java objects. For this reason, all java objects inherit a default implementation of these methods.

Usage of hashCode() and equals()
hashCode() method returns integer for a given object. This integer is used for determining the bucket location, when this object needs to be stored in some HashTable like data structure. By default, Object’s hashCode() method returns an integer representation of memory address where object is stored.

equals() method is used to simply verify the equality of two objects. Default implementation simply check the object references of two objects to verify their equality.

Overriding the default behavior

Everything works fine until you do not override any of these methods in your classes. But, sometimes application needs to change the default behavior of some objects.
Lets take an example where your application has Employee object. Lets create a minimal possible structure of Employee class::

public class Employee
{
    private Integer id;
    private String firstname;
    private String lastName;
    private String department;
    public Integer getId() {
        return id;
    }
    public void setId(Integer id) {
        this.id = id;
    }
    public String getFirstname() {
        return firstname;
    }
    public void setFirstname(String firstname) {
        this.firstname = firstname;
    }
    public String getLastName() {
        return lastName;
    }
    public void setLastName(String lastName) {
        this.lastName = lastName;
    }
    public String getDepartment() {
        return department;
    }
    public void setDepartment(String department) {
        this.department = department;
    }
}
Above Employee class has some very basic attributes and there accessor methods. Now consider a simple situation where you need to compare two employee objects.
public class EqualsTest {
    public static void main(String[] args) {
        Employee e1 = new Employee();
        Employee e2 = new Employee();
        e1.setId(100);
        e2.setId(100);
        //Prints false in console
        System.out.println(e1.equals(e2));
    }
}
No prize for guessing. Above method will print “false“. But, is it really correct after knowing that both objects represent same employee. In a real time application, this must return true.
To achieve correct behavior, we need to override equals method as below:
public boolean equals(Object o) {
    if(o == null)
    {
        return false;
    }
    if (o == this)
    {
        return true;
    }
    if (getClass() != o.getClass())
    {
        return false;
    }
     
    Employee e = (Employee) o;
    return (this.getId() == e.getId());
     
}
Add this method to your Employee class, and EqualsTest will start returning “true“.
So are we done? Not yet. Lets test again above modified Employee class in different way.
import java.util.HashSet;
import java.util.Set;
public class EqualsTest
{
    public static void main(String[] args)
    {
        Employee e1 = new Employee();
        Employee e2 = new Employee();
        e1.setId(100);
        e2.setId(100);
         //Prints 'true'
        System.out.println(e1.equals(e2));
        Set<Employee> employees = new HashSet<Employee>();
        employees.add(e1);
        employees.add(e2);
         
        //Prints two objects
        System.out.println(employees);
    }
}
Above class prints two objects in second print statement. If both employee objects have been equal, in a Set which stores only unique objects, there must be only one instance inside HashSet, after all both objects refer to same employee. What is it we are missing??
We are missing the second important method hashCode(). As java docs say, if you override equals() method then you must override hashCode() method. So lets add another method in our Employee class.
@Override
public int hashCode()
{
    final int PRIME = 31;
    int result = 1;
    result = PRIME * result + getId();
    return result;
}
Once above method is added in Employee class, the second statement start printing only single object in second statement, and thus validating the true equality of e1 and e2.

Overriding hashCode() and equals() using Apache Commons Lang

Apache commons provide two excellent utility classes for generating hash code and equals methods. Below is its usage:
import org.apache.commons.lang3.builder.EqualsBuilder;
import org.apache.commons.lang3.builder.HashCodeBuilder;
public class Employee
{
    private Integer id;
    private String firstname;
    private String lastName;
    private String department;
    public Integer getId() {
        return id;
    }
    public void setId(Integer id) {
        this.id = id;
    }
    public String getFirstname() {
        return firstname;
    }
    public void setFirstname(String firstname) {
        this.firstname = firstname;
    }
    public String getLastName() {
        return lastName;
    }
    public void setLastName(String lastName) {
        this.lastName = lastName;
    }
    public String getDepartment() {
        return department;
    }
    public void setDepartment(String department) {
        this.department = department;
    }
    @Override
    public int hashCode()
    {
        final int PRIME = 31;
        return new HashCodeBuilder(getId()%2==0?getId()+1:getId(), PRIME).toHashCode();
    }
    @Override
    public boolean equals(Object o) {
    if (o == null)
       return false;
        
    if (o == this)
       return true;
        
    if (o.getClass() != getClass())
       return false;
     
    Employee e = (Employee) o;
     
    return new EqualsBuilder().
              append(getId(), e.getId()).
              isEquals();
    }
}
Alternatively, if you are using any code editor, they also must be capable of generating some good structure for you. For example, Eclipse IDE has option under right click on class >> source > Generate hashCode() and equals() … will generate a very good implementation for you.

Important things to remember

1) Always use same attributes of an object to generate hashCode() and equals() both. As in our case, we have used employee id.
2) equals() must be consistent (if the objects are not modified, then it must keep returning the same value).
3) Whenever a.equals(b), then a.hashCode() must be same as b.hashCode().
4) If you override one, then you should override the other.

Special Attention When Using in ORM

If you’re dealing with an ORM, make sure to always use getters, and never field references in hashCode() and equals(). This is for reason, in ORM, occasionally fields are lazy loaded and not available until called their getter methods.
For example, In our Employee class if we use e1.id == e2.id. It is very much possible that id field is lazy loaded. So in this case, one might be zero or null, and thus resulting in incorrect behavior.
But if uses e1.getId() == e2.getId(), we can be sure even if field is lazy loaded; calling getter will populate the field first.
This is all i know about hashCode() and equals() methods. I hope, it will help someone somewhere.
If you feel, I am missing something or wrong somewhere, please leave a comment. I will update this post again to help others.

Happy Learning !!

Tuesday, December 22, 2015

Why to have a private constructor?

In Java, it is possible to have a private constructor. When and why should we use private constructor is explained in detail below. Defining a constructor with the private modifier says that only the native class (as in the class in which the private constructor is defined) is allowed to create an instance of the class, and no other caller is permitted to do so.

There are two possible reasons why one would want to use a private constructor
a. You don’t want any objects of your class to be created at all
b. You only want objects to be created internally –as in only created in your class.

Private constructors can be used in the singleton design pattern
A singleton is a design pattern that allows only one instance of your class to be created, and this can be accomplished by using a private constructor.

Private constructors can prevent creation of objects
The other possible reason for using a private constructor is to prevent object construction entirely. When would it make sense to do something like that? Of course, when creating an object doesn’t make sense – and this occurs when the class only contains static members. And when a class contains only static members, those members can be accessed using only the class name – no instance of the class needs to be created.

Java always provides a default, no-argument, public constructor if no programmer-defined constructor exists. Creating a private no-argument constructor essentially prevents the usage of that default constructor, thereby preventing a caller from creating an instance of the class. Note that the private constructor may even be empty.

Thursday, December 10, 2015

difference between classpath and buildpath

The classpath is a Java terminology and buildpath is a means to construct java classpath from artifacts in elcipse like IDE's. In java world, both mean the same.
 
The classpath is a Java thing. It's a list of either folders or jar files to consider (in order) when resolving classes to be loaded. It's used by the Java JVM. It can be specified by the CLASSPATH environment variable or java -classpath. It's a list of either Jar files or folders separated by a ":" on Linux/OSX systems or ";" on Windows.
The Eclipse build path is a means to construct this Java classpath from artifacts in the Eclipse environment. The Configure Build Path dialog is used to manipulate a file in your project called .classpath (normally hidden). This dialog allows you to form the Java classpath from Jar files, files you have built, folders, external Jar files and other things. It also controls where the Java Development Tooling (JDT) will locate your compiled files, and other things related to class files. The Eclipse help has pretty good documentation on this.
 

The build path is used for building your application. It contains all of your source files and all Java libraries that are required to compile the application. These are typically required during building the build. (mostly required even during the runtime)
Buildpath is not standard Java terminology. It is the term for the richer way that a typical IDE specifies the relationship between the "modules" or "projects" that make up an application. The IDE uses this to figure out the classpath and sourcepath for compiling the Java code, and the classpath for running it. The IDE also uses the build path to figure out how to package up your code and its dependencies as (for example) a WAR file.


The classpath is used for executing the application. This includes all java classes and libraries that are needed to run the java application. A Classpath is mandatory, the default path is . which is used if the java virtual machine can't find a user defined path. (CLASSPATH environment variable, -cp flag or Class-Path: attribute in a jar manifest)
The classpath is the conventional way to tell the Java compiler and the Java runtime where to find compiled classes. It is typically a sequence of JAR file names and directory names. The classpath used by the compiler and the runtime system don't have to be the same, but they typically "should be*, especially for a small project.

 
For example, an Eclipse build path for a project includes the other projects that it depends on, and lists any additional library JARs that the project contains / relies on. It also lists the packages in the current project that downstream projects can depend on.

(If you are using Maven for your project, the IDE buildpath mechanism is secondary to the dependencies declared in the POM files. For example, using Eclipse with the m2eclipse, the buildpath is synthesized from the POM files.)

Developing Restful Web services Using IBM JAX-RS

Java™ API for RESTful Web Services (JAX-RS) is a programming model that provides a mechanism for developing services that follow Representational State Transfer (REST) principles. Using JAX-RS, development of RESTful services is simplified.

The IBM® implementation of JAX-RS provides an implementation of the JAX-RS specification.

IBM JAX-RS includes the following features:
  • JAX-RS server runtime
  • Standalone client API with the option to use Apache HttpClient 4.0 as the underlying client
  • Built-in entity provider support for JSON4J
  • An Atom JAXB model in addition to Apache Abdera support
  • Multipart content support
  • A handler system to integrate user handlers into the processing of requests and responses
Required Jars:
  • jsr311-api.jar
  • commons-lang.jar
  • slf4j-api.jar
  • slf4j-jdk14.jar
  • ibm-wink-jaxrs.jar
Step 1 - Creating the Root Resource
As defined in the JAX-RS specification, by default, resource instances are created per request.  For the JAX-RS runtime environment to create a resource instance, you must have either a constructor with no argument or a constructor with only JAX-RS annotated parameters(@Context,@HeaderParam,@CookieParam,@MatrixParam,@QueryParam,@PathParam). present.
I created a class with no constructor.
public class HelloWorld {

}
Step 2 – Adding path to resource
Add a @javax.ws.rs.Path annotation to HelloWorld class.  For each @javax.ws.rs.Path annotation, set the value as the part of the URL after the base URL of the application.

@Path("/home")
public class HelloWorld {
..
}

Step 3 – Adding method to resource
 I have created a method called welcomeMessage and annotate the method as GET
@Path("/home")
public class HelloWorld {

      @GET
      public String welcomeMessage(){
            return "Welcome to Our Websphere Portal JAX-RS";
      }    
}
Whenever an HTTP GET request is received by this class, the welcomeMessage method will be invoked.


Step 4 – Creating a javax.ws.rs.core.Application sub-class
For non-JAX-RS aware web container environments (most environments are currently non JAX-RS aware), a javax.ws.rs.core.Application sub-class needs to be created which returns sets of JAX-RS root resources and providers. In the following example, there is only one root resource that will need to be returned.
public class RestConfig extends  Application{
      public Set<Class<?>> getClasses() {
            Set<Class<?>> classes = new HashSet<Class<?>>();
            classes.add(HelloWorld.class);
            return classes;
      }
}
Step 5 – Configure the web.xml file for the JAX-RS application
We need to modify the web.xml so that the servlet container knows that the web application is JAX-RS supported and what are the JAX-RS classes by specifying the application configuration sub class as a parameter.
<web-app id="WebApp_ID" version="2.5" xmlns="http://java.sun.com/xml/ns/javaee" xmlns:xsi="http://www.w3.org/2001/XMLSchema-instance" xsi:schemaLocation="http://java.sun.com/xml/ns/javaee http://java.sun.com/xml/ns/javaee/web-app_2_5.xsd">
      <display-name>RestExample</display-name>
      <servlet>
                  <servlet-name>REST</servlet-name>
                  <servlet-class>com.ibm.websphere.jaxrs.server.IBMRestServlet</servlet-class>
                  <init-param>
                        <param-name>javax.ws.rs.Application</param-name>
                        <param-value>com.ourwebsphereportal.jaxrs.RestConfig</param-value>
                  </init-param>
                  <load-on-startup>1</load-on-startup>
            </servlet>
            <servlet-mapping>
                  <servlet-name>REST</servlet-name>
                  <url-pattern>/rest/*</url-pattern>
    </servlet-mapping>
</web-app>


on accessing,

where RestExample is context root